Tengine安装
Tengine 是由淘宝网发起的 Web 服务器项目。它在 Nginx 的基础上,针对大访问量网站的需求,添加了很多高级功能和特性。Tengine 的性能和稳定性已经在大型的网站如淘宝网,天猫商城等得到了很好的检验。它的最终目标是打造一个高效、稳定、安全、易用的 Web 平台。
Tengine 特性:
支持 HTTP 的 CONNECT 方法,可用于正向代理场景;
支持异步 OpenSSL,可使用硬件如:QAT 进行 HTTPS 的加速与卸载;
增强相关运维、监控能力,比如异步打印日志及回滚,本地 DNS 缓存,内存监控等;
Stream 模块支持 server_name 指令;
更加强大的负载均衡能力,包括一致性 hash 模块、会话保持模块,还可以对后端的服务器进行主动健康检查,根据服务器状态自动上线下线,以及动态解析 upstream 中出现的域名;
输入过滤器机制支持。通过使用这种机制 Web 应用防火墙的编写更为方便;
支持设置 proxy、memcached、fastcgi、scgi、uwsgi 在后端失败时的重试次数;
动态脚本语言 Lua 支持。扩展功能非常高效简单;
支持按指定关键字(域名,url等)收集 Tengine 运行状态;
组合多个 CSS、JavaScript 文件的访问请求变成一个请求;
自动去除空白字符和注释从而减小页面的体积
自动根据 CPU 数目设置进程个数和绑定 CPU 亲缘性;
监控系统的负载和资源占用从而对系统进行保护;
显示对运维人员更友好的出错信息,便于定位出错机器;;
更强大的防攻击(访问速度限制)模块;
更方便的命令行参数,如列出编译的模块列表、支持的指令等;
支持 Dubbo 协议;
可以根据访问文件类型设置过期时间;
下载源码包:
tengine 源码:http://tengine.taobao.org/download_cn.html
pcre 源码:http://www.pcre.org/
openssl 源码:https://www.openssl.org/source/
zlib 源码:http://www.zlib.net/
安装包:
支持lua模块
wget http://luajit.org/download/LuaJIT-2.0.4.tar.gz
#wget https://github.com/simpl/ngx_devel_kit/archive/v0.3.0.tar.gz
#wget https://github.com/openresty/lua-nginx-module/archive/v0.10.13.tar.gz
安装LuaJIT
tar xf LuaJIT-2.0.4.tar.gz
#cd xf LuaJIT-2.0.4
#make PREFIX=/usr/local/luajit
#make install PREFIX=/usr/local/luajit
#ln -s /usr/local/luajit/lib/libluajit-5.1.so.2 /lib64/libluajit-5.1.so.2
添加环境变量
export LUAJIT_LIB=/usr/local/luajit/lib
export LUAJIT_INC=/usr/local/luajit/include/luajit-2.0
#source /etc/profile
安装tingine
#tar xf v0.3.0.tar.gz
#tar xf v0.10.13.tar.gz
#tar xf nginx-1.12.0.tar.gz
debain 环境下安装:
sudo apt-get install -y openssl libssl-dev
sudo apt-get install -y libpcre3 libpcre3-dev
apt-get install -y zlib1g-dev
Centos环境下安装:
yum -y update && yum install -y gcc wget tree pcre-devel
zlib-devel openssl openssl-devel
libxml2 libxml2-dev libxslt-devel gd-devel
ncurses-devel perl perl-ExtUtils-Embed
gperftools
cd tengine-2.2.2
./configure –conf-path=/etc/nginx/nginx.conf –user=www-data –group=www-data –prefix=/etc/nginx –sbin-path=/usr/sbin/nginx –with-ipv6 –error-log-path=/var/log/nginx/error.log –http-log-path=/var/log/nginx/access.log –pid-path=/var/run/nginx.pid –lock-path=/var/lock/nginx.lock –http-client-body-temp-path=/var/cache/nginx/client_temp –http-proxy-temp-path=/var/cache/nginx/proxy_temp –http-fastcgi-temp-path=/var/cache/nginx/fastcgi_temp –http-uwsgi-temp-path=/var/cache/nginx/uwsgi_temp –http-scgi-temp-path=/var/cache/nginx/scgi_temp –without-select_module –without-http_uwsgi_module –without-http_empty_gif_module –with-http_ssl_module –with-http_addition_module –with-http_sub_module –with-http_dav_module –with-http_flv_module –with-http_gunzip_module –with-http_gzip_static_module –with-http_random_index_module –with-http_secure_link_module –with-http_stub_status_module –with-http_realip_module –with-http_concat_module=shared –with-http_sysguard_module=shared –with-http_dyups_module –with-file-aio –add-module=../ngx_devel_kit-0.3.0/ –add-module=../lua-nginx-module-0.10.13/ \
Make
Make install
Make会报错:cc1: all warnings being treated as errors
make[1]: *** [objs/Makefile:617: objs/src/core/ngx_murmurhash.o] Error 1
make[1]: Leaving directory ‘/home/tools/install/tengine-2.2.2’
vim objs/Makefile:
CFLAGS = -pipe -O -W -Wall -Wpointer-arith -Wno-unused -Werror -g -DNDK_SET_VAR
-Werror -g去掉
CFLAGS = -pipe -O -W -Wall -Wpointer-arith -Wno-unused -DNDK_SET_VAR
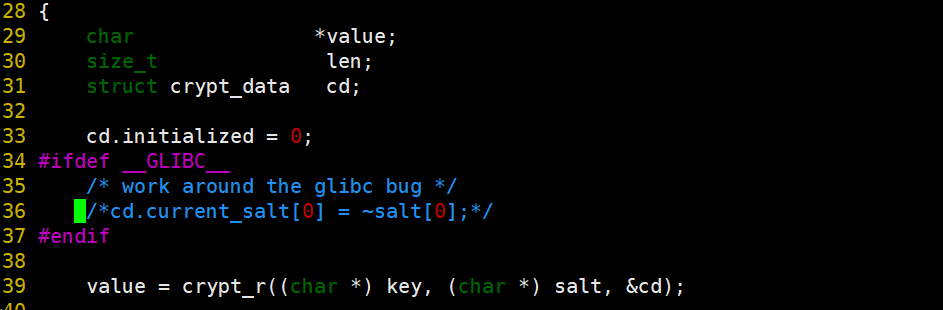
执行make时,报错:src/os/unix/ngx_user.c:36:7: error: ‘struct crypt_data’ has no member named ‘current_salt’ cd.current_salt[0] = ~salt[0];
vim tengine-2.2.2/src/os/unix/ngx_user.c
cd.current_salt[0] = ~salt[0];
注释掉:
/*cd.current_salt[0] = ~salt[0];*/
/* work around the glibc bug */
/*cd.current_salt[0] = ~salt[0];*/
sed -i “s/ -Werror -g / /g” ./objs/Makefile
make && make install
echo `nginx -v`
#不显示版本号
sed -i “/server_tokens off;/a server_tag off; \n server_info off;” nginx.conf
mkdir -p /var/cache/nginx/scgi_temp
chown www-data.root /var/cache/nginx/scgi_temp
添加系统服务:
cat >>/etc/systemd/system/nginx.service <<EOF
[Unit]
Description=The nginx HTTP and reverse proxy server
After=syslog.target network.target remote-fs.target nss-lookup.target

[Service]
Type=forking
PIDFile=/var/run/nginx.pid
ExecStartPre=/usr/sbin/nginx -t -c /etc/nginx/nginx.conf
ExecStart=/usr/sbin/nginx -c /etc/nginx/nginx.conf
ExecReload=/usr/sbin/nginx -s reload
ExecStop=/usr/sbin/nginx -s stop
ExecQuit=/usr/sbin/nginx -s quit
PrivateTmp=true

[Install]
WantedBy=multi-user.target
EOF
后续就是优化配置了。